


A Complete Guide to Laser Engraving Different Types of Wood (Beginner's Guide 2026)
Introduction
Wood is one of the most popular materials for laser engraving. It's affordable, widely available, and produces beautiful, natural-looking results that are perfect for everything from custom gifts to home decor projects. But if you're new to laser engraving, you might be wondering which types of wood work best, and what settings you should use for each.
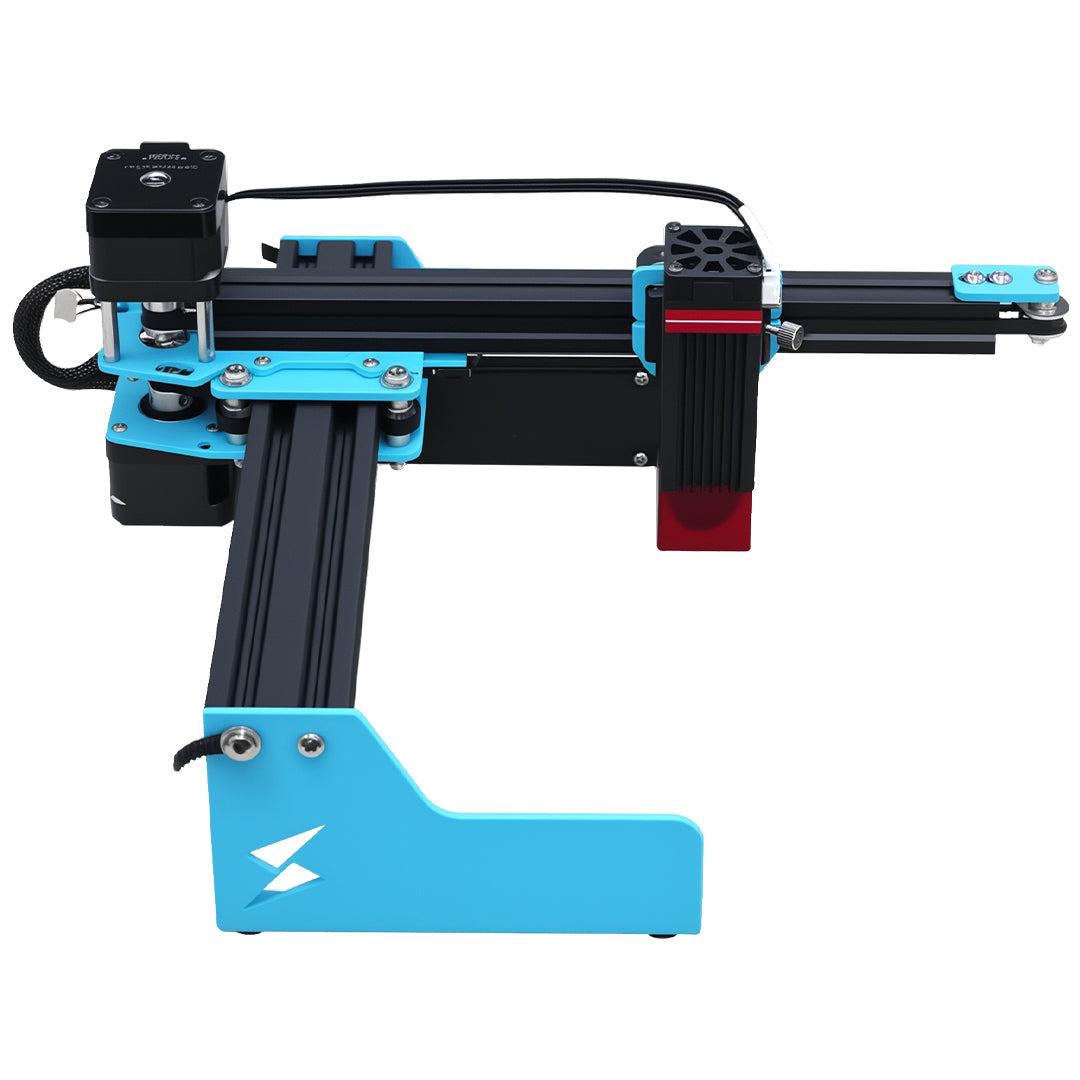
If you're just getting started with laser engraving, the Tyvok A1 Mini is an excellent diode laser that handles wood engraving perfectly, especially for beginners looking to experiment with different wood types. If you're looking for more power, portability, or the ability to handle galvo engraving, the Tyvok P2 is another great option that can also handle most wood types with incredible speed and precision.
The truth is, different woods react differently to laser engraving. The color depth, contrast, and even the amount of smoke produced can vary dramatically between species. Some woods produce dark, high-contrast engravings that look amazing right out of the laser, while others require more preparation or produce lighter results.
This complete guide will walk you through everything you need to know about laser engraving different types of wood, including recommended settings, pros and cons, and tips for getting great results.
Why Wood is Great for Laser Engraving
Before we dive into specific wood types, let's look at why wood is such a popular choice for laser engraving: - Natural beauty : Every piece of wood has unique grain patterns that make your engraving one-of-a-kind
-
Availability : You can find wood at any hardware store, lumber yard, or even hobby shop
-
Affordability : Many good engraving woods are very affordable, especially for small projects
-
Forgiving : Wood is generally easy to work with and forgiving of minor setting mistakes
-
Versatility : Works for everything from small jewelry to large cutting boards and wall art
-
Low waste : You can often use scrap pieces for practice or small projects
Common Wood Types for Laser Engraving
Let's go through the most popular wood types for laser engraving, what you can expect from each, and recommended settings.
1. Alder
Alder is a soft, light-colored hardwood that's becoming increasingly popular for laser engraving.
Pros:
-
Light background produces excellent contrast with dark engravings
-
Consistent grain pattern with few knots
-
Relatively inexpensive and easy to find
-
Low resin content, so less gumming on your lens
-
Cuts and engraves cleanly
Cons:
-
Softness means it can be prone to burning if settings are too high
-
Lighter color shows any mistakes more obviously
Recommended settings (5W diode laser):
-
Engraving : Power 50-70%, Speed 150-200 mm/s
-
Cutting : Power 80-100%, Speed 20-30 mm/s (for 1/4" thickness)
Best uses: Cutting boards, signs, coasters, decorative projects
2. Birch
Birch plywood is perhaps the most common wood for beginning laser users, and for good reason.
Pros:
-
Very consistent and stable
-
Affordable and readily available at any hardware store
-
Light color gives great contrast
-
Fewer voids than many other plywoods
-
Cuts cleanly with minimal burning
Cons:
-
Solid birch can be harder to find than birch plywood
-
Thin veneer on some birch plywood can bubble if cutting too deep
Recommended settings (5W diode laser):
-
Engraving : Power 40-60%, Speed 150-250 mm/s
-
Cutting : Power 70-90%, Speed 30-40 mm/s (1/4")
Best uses: Plywood projects, boxes, signs, ornaments, laser cut patterns
3. Cherry
Cherry is a beautiful hardwood with a warm, reddish-brown color that deepens with age.
Pros:
-
Beautiful natural color
-
Fine, even grain that produces smooth engravings
-
Moderate density that engraves very nicely
-
Produces excellent contrast
Cons:
-
More expensive than alder or birch
-
Can be harder to find in small quantities
Recommended settings (5W diode laser):
-
Engraving : Power 45-65%, Speed 120-180 mm/s
-
Cutting : Power 80-100%, Speed 15-25 mm/s (1/4")
Best uses: Cutting boards, kitchen utensils, high-end gifts, furniture inlays
4. Walnut
Walnut is a dark hardwood prized for its rich color and beautiful grain.
Pros:
-
Rich, dark brown color that looks premium
-
Very stable and consistent
-
Hardness produces clean, sharp engravings
-
Less resin than many other hardwoods
Cons:
-
One of the more expensive options
-
Dark background means lower contrast than lighter woods (engravings are lighter)
-
Can be more difficult to cut than softer woods
Recommended settings (5W diode laser):
-
Engraving : Power 60-80%, Speed 100-150 mm/s
-
Cutting : Power 90-100%, Speed 10-20 mm/s (1/4")
Best uses: Gun stocks, custom gifts, cutting boards, premium signs
5. Maple
Maple is a hard, light-colored wood that's very popular for kitchen projects.
Pros:
-
Very light color gives maximum contrast for dark engravings
-
Extremely hard and durable
-
Resists warping well
-
Fine, even grain produces sharp details
Cons:
-
Hardness means it requires more power for cutting
-
Can cause more wear on cutting tools
-
More expensive than softer woods
Recommended settings (5W diode laser):
-
Engraving : Power 55-75%, Speed 120-180 mm/s
-
Cutting : Power 100%, Speed 10-20 mm/s (1/4")
Best uses: Cutting boards, butcher blocks, kitchen utensils, wedding gifts
6. Oak
Red oak and white oak are both common in woodworking projects.
Pros:
-
Readily available at reasonable prices
-
Strong and durable
-
Distinctive grain pattern adds character
-
White oak is water-resistant, making it good for outdoor projects
Cons:
-
More porous than many other woods
-
Can absorb laser energy differently across the grain
-
Porous grain can trap smoke and soot, requiring more cleanup
Recommended settings (5W diode laser):
-
Engraving : Power 60-80%, Speed 100-150 mm/s
-
Cutting : Power 100%, Speed 15-25 mm/s (1/4")
Best uses: Furniture parts, outdoor signs, barrel projects, flooring inlays
7. Mahogany
Mahogany is a premium hardwood with a reddish-brown color and straight grain.
Pros:
-
Beautiful, consistent grain
-
Moderate density that engraves well
-
Very stable in changing humidity
-
Luxurious appearance for high-end projects
Cons:
-
Expensive compared to more common woods
-
Can be hard to find in some areas
-
Lower contrast than lighter woods
Recommended settings (5W diode laser):
-
Engraving : Power 50-70%, Speed 120-180 mm/s
-
Cutting : Power 90-100%, Speed 15-25 mm/s (1/4")
Best uses: Fine furniture, musical instruments, high-end gifts, cabinetry
8. Pine
Pine is a common softwood that's very affordable.
Pros:
-
Very inexpensive and easy to find
-
Soft, so it cuts and engraves quickly
-
Light color produces good contrast
-
Great for practice and beginners learning settings
Cons:
-
High resin content that can gum up your lens
-
Softness means it can char easily if settings are too high
-
Prone to knots and inconsistent grain
-
Not as durable as hardwoods
Recommended settings (5W diode laser):
-
Engraving : Power 30-50%, Speed 200-300 mm/s
-
Cutting : Power 60-80%, Speed 30-40 mm/s (1/4")
Best uses: Practice projects, beginner projects, Christmas ornaments, low-budget signs
Tips for Engraving Different Wood Types
No matter what type of wood you're using, these tips will help you get better results:
Always Test on Scrap First
Different batches of the same wood can vary slightly, especially with natural wood. Always do a small test engraving on a scrap piece of the same wood before engraving your final project. This lets you check contrast and adjust settings before committing.
Consider the Grain Direction
The direction of the grain can affect how the laser interacts with the wood. For engravings with fine details, it's generally better to have the grain running parallel to the longest dimension of your design.
Clean Up After Engraving
Most wood engravings will need some light cleaning after laser processing. Use a soft brush or cloth to remove any loose charred particles. For oily or resinous woods, you might need a slightly damp cloth (don't soak it) to remove residue.
Seal After Engraving for Best Results
Sealing your engraved wood not only protects it but can also enhance the contrast. A clear finish (polyurethane, lacquer, or even butcher block conditioner for cutting boards) will make the engraved areas darker and more visible.
Watch Out for Resin
Some woods (like pine and many exotic woods) have high resin content. This can vaporize and condense on your laser lens, reducing effectiveness. Clean your lens more often when working with these woods, and consider slightly lower power to reduce excessive melting.
Choosing the Right Wood for Your Project
Here's a quick guide to help you choose: - Best for beginners : Alder, birch plywood, pine (for practice)
-
Best for high contrast : Maple, birch, alder
-
Best for cutting boards : Maple, walnut, cherry (food-safe finishes)
-
Best for budget projects : Pine, birch plywood
-
Best for premium gifts : Walnut, cherry, mahogany
-
Best for outdoor projects : Cedar, redwood, white oak
Common Beginner Mistakes to Avoid
- Using too much power : This causes excessive burning and charring that can ruin your engraving. Start with lower power and work your way up.
- Not cleaning the lens : Resin and smoke buildup on your lens reduces power and causes uneven engraving.
- Skipping the test cut/test engrave : Even if you've used the same wood before, always test when starting a new project.
- Poor focus : Make sure your laser is properly focused, especially for thicker woods.
- Not securing the wood : Movement during engraving will blur your design. Always make sure your workpiece is firmly secured to your honeycomb bed.
Final Thoughts
Laser engraving wood is one of the most rewarding projects for beginners, and it's easy to get great results once you understand how different woods react to the laser. The key is starting with more common, forgiving woods like alder or birch plywood, practicing your settings, and working your way up to more expensive hardwoods as you gain confidence.
If you're just getting started, we recommend picking up a few different wood samples from your local hardware store and spending an afternoon testing different settings with different designs. This hands-on experience will teach you more than any guide can, and you'll quickly develop a feel for what works with your specific machine.
Ready to start your wood engraving journey? The Tyvok A1 Mini diode laser engraver is perfect for beginners, with enough power to handle most common wood types and a user-friendly interface that makes it easy to experiment with different settings. If you're looking for a portable galvo laser that can handle fast engraving on wood, check out the Tyvok P2.
For more information on getting started with laser engraving, check out our Beginner's Guide to Choosing Materials for Tyvok A1 Mini to learn about other materials you can engrave.