


Overview The CNC module based on LightBurn is a module that reads the laser PWM protocol and maps the grayscale values to the set depth values. It allows laser engraver users to compile toolpaths in LightBurn through simple settings, enabling basic CNC cutting tasks.
Device Parameters:
- Spindle Power:200W
- Spindle Speed:10,000 RPM
- Engraving Precision:±0.05mm
- Engraving Speed:<800mm/min
- Lead Screw Dimensions and Type:T8, lead 2MM
- Z-axis Travel of Module:50MM
- Maximum Cutting Depth:20MM
- Height Adjustment Method:Manual tool setting
- Engravable Materials:Soft materials such as plastic, wood, acrylic, PVC, PVB, etc.
Example Operation: Cutting a 10x10mm Wooden Block with 10mm Thickness
-
Preparation:
- Prepare a wooden block with a thickness of 10mm and fix it on the CNC base module using double-sided tape.
- Ensure the tool installed is a 3.175mm woodworking milling cutter.
-
Drawing in LightBurn:
- Open LightBurn and draw a 10x10mm square.
- Select the drawn square and click "Offset." Set the offset distance to the tool radius of 1.59mm.

- Delete the original 10x10mm shape and select the offset shape. Add 10 layers, setting each layer's speed to 800mm/min.
- Set the power for the 1st layer to 10%, the 2nd layer to 20%, the 3rd layer to 30%, and so on, until the 10th layer is set to 100%.
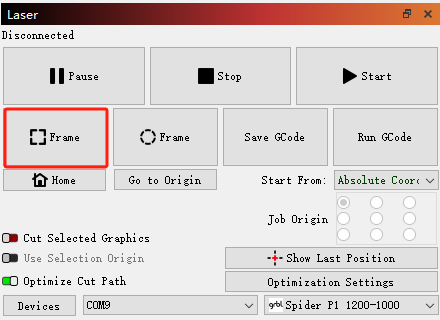
- Confirm the cutting position using the "Frame" function in LightBurn.

-
Module Setup:
- Use the module's knob to select "Reset" to reset the module to the upper limit.
- Insert the tool setter terminal, place the tool setter under the tool on the workpiece, and clip the tool setter's alligator clip to the tool.
- Use the knob to select "Tool Set." The tool will slowly descend, automatically stopping when it touches the tool setter, completing the tool setting.
- Remove the tool setter, alligator clip, and unplug the tool setter terminal.
- Use the knob to select "Depth" and set the cutting depth to 10mm.
- Select "Start" using the knob. The spindle will start rotating, and the module will begin operation.

-
Engraving:
- Click "Start" in LightBurn to begin engraving.
- Once engraving is complete, the device will automatically return to the starting position. To stop the module, click the knob.
- Note:If you need to pause or stop the operation during work, you must first stop it in LightBurn before stopping the module to avoid the risk of tool breakage.
💡 Tip: Looking for the best value galvo laser for metal marking? The Tyvok P2 2W Galvo Laser is our top pick for 2026 — currently 50% OFF at just $149!


