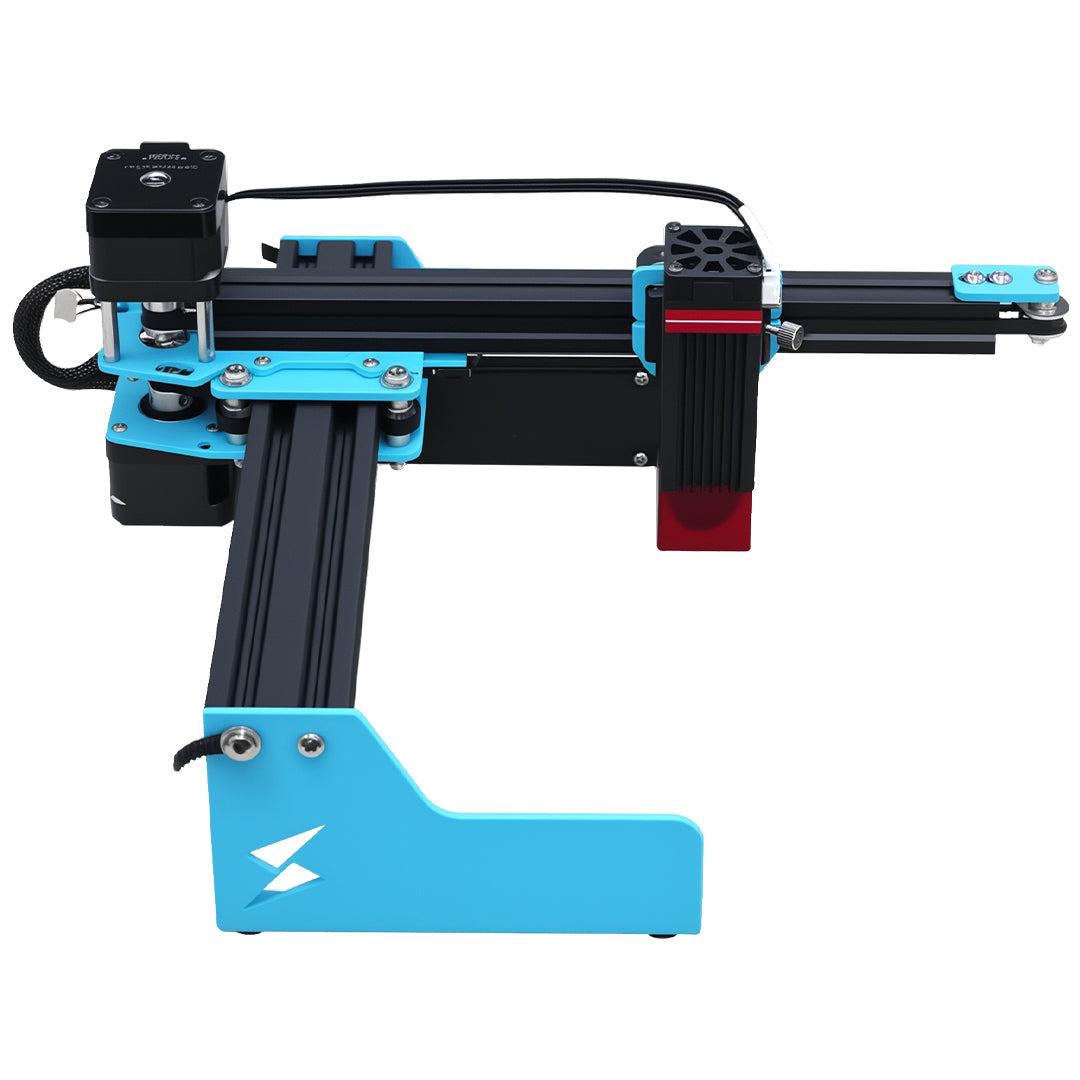


Tyvok A1 Mini Common Problems and How to Fix Them: Complete Troubleshooting Guide
The Tyvok A1 Mini is a great budget galvo laser engraver, but like any machine, you might run into some issues, especially when you're just getting started.
I've helped dozens of A1 Mini owners troubleshoot their machines, and these are the most common problems I see, with step-by-step fixes you can do yourself.
If you're having an issue with your A1 Mini, you're probably not alone — check this guide first before contacting support.
1. Computer Doesn't Recognize the Machine
Symptoms:
- LightBurn says "Device not connected"
- USB device not recognized error
- Can't find the serial port
How to Fix It:
Step 1: Check your USB cable. Try a different USB cable — not all cables are for data. Some cheap cables are only for charging. Use a good quality USB 2.0 A to Micro-B cable.
Step 2: Try a different USB port on your computer. If you're using a USB hub, plug it directly into your computer instead.
Step 3: Install the correct CH340 drivers. Most A1 Mini use the CH340 chip for USB-to-serial. You might need to install the driver manually.
- Download from the official CH340 website
- Install the driver for your OS
- Restart your computer
- Try connecting again
Step 4: Check Device Manager (Windows) or System Information (Mac) to see if the device shows up. If it has a yellow exclamation mark, the driver is the problem.
2. Engraving is Out of Focus / Blurry
Symptoms:
- Engraving looks fuzzy or blurry
- Some areas are darker than others
- Poor contrast
How to Fix It:
This is the most common problem with beginners, and it's usually just incorrect focusing.
Step 1: Re-do your focusing carefully:
- Lower the bed until the laser head just touches the focusing gauge
- Make sure the material itself is flat — warped material will be out of focus in spots
- Check that the bed is locked securely after adjusting
Step 2: If it's still blurry, check the lens:
- Is the lens clean? Fingerprints or dust on the lens cause blurriness
- Clean the lens gently with lens cleaning fluid and a microfiber cloth
- Don't press too hard — you can scratch the coating
Step 3: Check your speed and power settings. If you're going too slow with too much power, you can get burning that looks blurry. Try increasing speed and decreasing power.
3. Laser Doesn't Fire At All
Symptoms:
- The machine moves, but nothing gets engraved
- No laser beam comes out
How to Fix It:
Step 1: Check the power switch at the back. Is it turned on? Is the indicator light on?
Step 2: Check the wire connection between the laser module and the controller. Sometimes it comes loose during shipping. Open the case and make sure it's plugged in securely.
Step 3: Check your LightBurn settings:
- Is the laser enabled in your device settings?
- Are you sending the job to the correct device?
- Is your power setting above zero? It happens — everyone has accidentally sent a job with 0% power.
Step 4: Test the laser manually. In LightBurn, use the "Test Laser" button with low power. If it still doesn't fire, you might have a faulty laser module — contact Tyvok support.
4. Engraving is Too Faint / Not Deep Enough
Symptoms:
- You can barely see the engraving
- The depth is less than you expected
How to Fix It:
Step 1: Check your focus first — out of focus = faint engraving. Go back and re-focus.
Step 2: Increase power or decrease speed. If you're going too fast with too little power, you won't get deep engraving.
Try this: 50% power, 500 mm/s instead of 20% power at 2000 mm/s — you'll get deeper engraving with less charring.
Step 3: Multiple passes. For deeper engraving on hard materials, do two or three lighter passes instead of one heavy pass. This gives better results.
Step 4: Clean your lens. A dirty lens reduces laser power output.
5. Engraving is Misaligned / Off Position
Symptoms:
- Your design is in the wrong place
- The frame doesn't match where the actual engraving happens
- Diagonal lines are crooked
How to Fix It:
Step 1: Check your origin settings. The A1 Mini uses top-left origin. Make sure your LightBurn device settings match this. If you set origin to bottom-left, everything will be off.
Step 2: Check for loose belts or screws. Over time, things can loosen. Check that all the set screws on the galvo mirrors are tight.
Step 3: Re-calibrate your machine. If everything is consistently off, you might need to adjust the galvo calibration in LightBurn. Tyvok has a good calibration guide in their documentation.
6. Machine Makes Strange Noises
Symptoms:
- Grinding or clicking noises when moving
- Unusual sounds during operation
How to Fix It:
Step 1: Clean the galvo mirrors and bearings. A little bit of dust can cause noise — gently clean everything.
Step 2: Check that all screws are tight. Shipping can loosen things. Go through and tighten all the visible screws on the frame and galvo assembly.
Step 3: If it's still noisy, add a tiny drop of light machine oil to the bearings. Don't use too much — you don't want oil getting on the mirrors or lens.
7. USB Connection Keeps Dropping Out
Symptoms:
- Connection drops mid-job
- LightBurn loses connection randomly
How to Fix It:
Step 1: Try a different USB cable. Bad USB cables are the #1 cause of this. Get a good quality shielded USB cable.
Step 2: Don't use a long USB cable. Keep it under 6 feet (2 meters). Longer cables can cause signal dropouts.
Step 3: On Windows, disable USB selective suspend:
- Go to Power Options → Change plan settings → Change advanced power settings
- USB settings → USB selective suspend setting → Disable it
- This prevents Windows from turning off the USB port to save power
Step 4: Try a different USB controller. If you're using a USB 3.0 port, try USB 2.0 instead (or vice versa). Sometimes there are compatibility issues.
8. Burning or Charring Too Much
Symptoms:
- Engraving has a lot of black smoke residue
- Material is burning more than you want
- Edges are charred black
How to Fix It:
Step 1: Get an air assist. Air assist blows away the smoke and reduces charring dramatically. This is the #1 upgrade you can make to your A1 Mini.
Step 2: Increase speed, decrease power. Faster passes with lower power give cleaner results than slow heavy passes.
Step 3: Use masking tape over the material before engraving. The tape catches the smoke residue and keeps your material cleaner. Just peel it off when you're done.
Step 4: Let the laser cool between passes if you're doing multiple passes. Overheating causes more charring.
9. X-Axis or Y-Axis Doesn't Move
Symptoms:
- One axis doesn't move
- Machine just sits there when you try to jog
How to Fix It:
Step 1: Check the wiring connection to the motor. Make sure the connector is fully seated.
Step 2: Check for obstructions. Is something blocking the movement? Did a screw fall inside the machine?
Step 3: In LightBurn, check the console for error messages. If it says "Homing failed", that's a clue to the problem.
10. Software Crashes When Sending a Job
Symptoms:
- LightBurn crashes when you start engraving
- Job won't send to the machine
How to Fix It:
Step 1: Simplify your design. Very complex designs with thousands of vectors can overwhelm the buffer on the A1 Mini. Try reducing the number of points.
Step 2: Split large jobs into multiple smaller jobs. Send them one at a time.
Step 3: Update LightBurn to the latest version. Older versions have bugs that are fixed in newer versions.
Step 4: Try using LaserGRBL instead to see if it's a software issue. If it works in LaserGRBL but not LightBurn, you know the problem is in LightBurn settings.
11. Why is My A1 Mini Engraving Deeper on One Side?
Symptoms:
- One side of the engraving is deeper than the other
- Uneven depth across the work area
How to Fix It:
This is usually because your material isn't flat or your bed isn't level.
Step 1: Check that your bed is perfectly level. Use a small level to check. Adjust the feet until it's level.
Step 2: Make sure your material is flat. Some wood warps — use a piece that's flat, or shim underneath to level it.
Step 3: Check that the laser module is mounted parallel to the bed. If it's tilted, one side will be closer (deeper engraving) than the other.
12. WiFi Doesn't Work / Can't Connect
Symptoms:
- Can't connect to the machine via WiFi
- Connection drops constantly
How to Fix It:
Step 1: Make sure you're connecting to 2.4GHz WiFi. Most laser controllers don't support 5GHz WiFi. Check your router settings — most broadcast both, make sure 2.4GHz is enabled.
Step 2: The machine needs to be on the same WiFi network as your computer. It can't connect through guest networks or VPNs usually.
Step 3: If it still doesn't work, just use USB — it's more reliable anyway for most beginners.
When to Contact Tyvok Support
If you try all these fixes and you still have problems, it's time to contact Tyvok support. They have pretty good customer service and will help you get it sorted out.
Have this information ready when you contact them:
- Your order number
- Clear photos or video of the problem
- What you've already tried to fix it
Preventive Maintenance to Avoid Problems
A little maintenance goes a long way with your A1 Mini:
- Clean the lens regularly — after every 10-20 hours of use
- Keep the machine clean — brush out dust and debris
- Check tightness of screws every few months
- Keep the galvo mirrors clean — don't let dust build up
- Store in a dry place — moisture can damage electronics
Final Thoughts
Most problems with the Tyvok A1 Mini are simple fixes that you can do yourself in 10-15 minutes. The most common issues are:
- Bad focusing (fix: re-focus carefully)
- Bad USB cable (fix: replace with a good one)
- Dirty lens (fix: clean it)
- Incorrect origin settings (fix: check LightBurn device settings)
Keep this guide bookmarked — the next time you have a problem, you'll know where to look.
Got another problem I didn't cover here? Drop a comment below and I'll help you troubleshoot it.
Happy engraving!
Related Reading: How to Set Up Your Tyvok A1 Mini for First Time: Complete Step-by-Step Guide 2026
Related Reading: How To Start A Laser Engraving Side Hustle With Tyvok A1 Mini In 2026
Related Reading: How To Set Up Your Tyvok A1 Mini Step By Step Beginner Guide
💡 Recommended: The Tyvok P2 2W Galvo Laser is our top pick for metal marking & jewelry engraving. Currently 50% OFF at just $149!