


How to Laser Engrave Stainless Steel Tumblers: Settings, Tips, and Best Practices
So, you've got a laser engraver and a stack of stainless steel tumblers, ready to create personalized, professional-looking gifts or products. But your first few attempts might have left you with faint, inconsistent marks or, worse, no mark at all. Laser engraving bare stainless steel can be tricky—it's reflective and requires specific techniques to get that coveted dark, permanent mark. This guide will walk you through everything you need to know, from the science behind the mark to the exact settings and tricks that work, whether you're using a diode, CO2, or fiber laser.
Understanding the Challenge: Why Stainless Steel is Different
Stainless steel isn't like wood or acrylic. Its chromium content creates a protective oxide layer that makes it highly resistant to corrosion and, unfortunately, to being marked by lower-powered lasers. A standard CO2 or diode laser beam will mostly reflect off the shiny surface, absorbing just enough energy to heat it. Without the right process, this typically results in a light, often rainbow-colored "annealing" mark, not the deep, dark engraving most people want.
To get a strong, dark mark, we need to facilitate a reaction. The goal is to create oxidation and carbon migration on the surface. This is often achieved by using a marking compound or by adjusting settings to intensely heat a thin surface layer, allowing it to react with oxygen in the air or carbon from a coating. Understanding this "why" is key to mastering the "how."
Choosing Your Laser and Method
The best approach depends heavily on the type of laser you own. Here’s a breakdown:
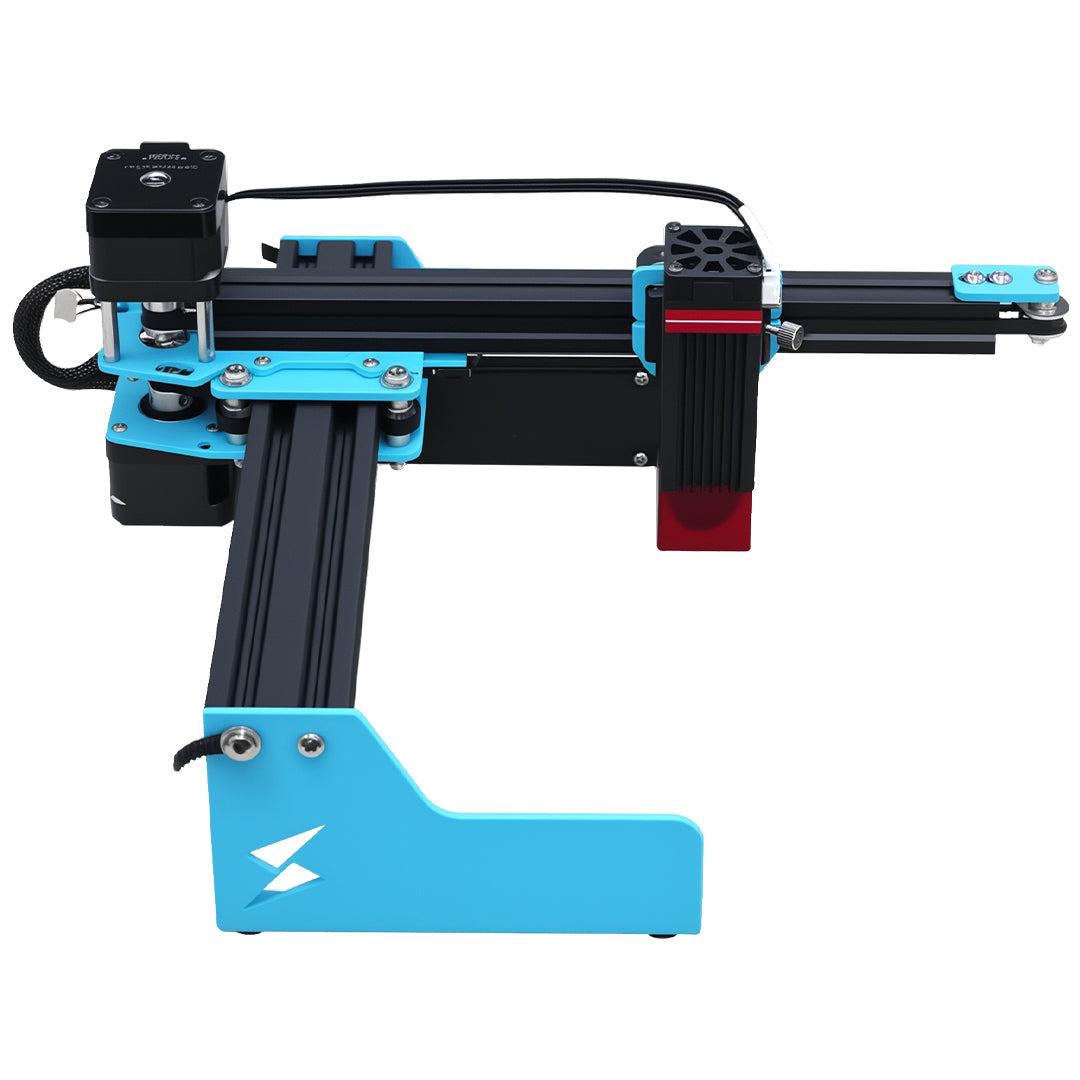
For Diode Laser Users (e.g., Tyvok A1 Mini)
Diode lasers (like blue or infrared diodes) have a wavelength that metals absorb better than a CO2 laser's wavelength. However, their lower power means they need assistance. * The Must-Use Method: Laser Marking Spray. Products like Cermark LMM-6000, Dry Moly Lube, or even affordable alternatives like mustard or black tempera paint act as a sacrificial layer. The laser burns this coating, fusing it onto the metal surface to create a permanent, dark mark. Cleanliness is critical—degrease the tumbler with isopropyl alcohol first. * The Process: Apply a thin, even coat of your marking agent. Let it dry completely. Engrave through the coating. Wash off the residue with water.
For CO2 Laser Users (e.g., Tyvok K1)
CO2 lasers (like the 40W-100W in many K-series machines) are the most common in hobbyist workshops. They struggle with bare metal but excel when using a marking compound. * Primary Method: Laser Marking Spray/Compound. This is the standard, reliable method for CO2 lasers. Follow the same clean, coat, engrave, and wash process as for diodes. The higher power allows for faster engraving speeds. * Advanced Method: Annealing. With careful power and speed control, you can heat the stainless steel to a point where it develops a permanent oxide layer. This creates colors (gold, bronze, blue, black) based on temperature. It requires precise tuning and a machine with good power control, like a Tyvok P2 Galvo laser, which is exceptional for this due to its speed and precision.
For Fiber & Galvo Laser Users (e.g., Tyvok P2 10W Galvo)
These are the "easy button" for metal. MOPA fiber lasers and high-power IR diode galvos like the Tyvok P2 are designed for marking metals. They directly alter the surface microstructure of the metal, creating a deep, dark, and incredibly durable mark without any sprays or coatings. If you plan to engrave metals frequently, this type of laser is a game-changer.
Best Laser Settings and Step-by-Step Tutorial
Here’s a practical walkthrough using the most common method: marking spray with a CO2 or diode laser.
Step 1: Preparation is 90% of Success
- Clean the Tumbler: Wipe the entire area with 91%+ isopropyl alcohol. Any oils from your skin will ruin the mark.
- Apply Marking Compound: In a well-ventilated area, spray a light, even coat of your marking spray (e.g., Cermark) onto the area to be engraved. Hold the can 6-8 inches away. One or two thin coats are better than one thick, drippy coat. Let it dry completely—it should look flat black.
- Secure the Tumbler: Use a tumbler rotary attachment. This is non-negotiable for a consistent, wrap-around engraving. Ensure it's level and the tumbler is centered and secure.
Step 2: Machine Settings (Starting Points)
Always run a test grid on a spare piece or the bottom of a tumbler first!
For a 10W Diode Laser (e.g., Tyvok A1 Mini with marking spray): * Power: 100% * Speed: 1000-1500 mm/min * Passes: 1-2 * Line Interval: 0.06 - 0.08mm
For a 40W-60W CO2 Laser (e.g., Tyvok K1 with marking spray): * Power: 20-30% (for 40W), 15-25% (for 60W) * Speed: 300-500 mm/s * DPI/PPI: 500-1000 * Passes: 1
For a 10W Galvo Laser (e.g., Tyvok P2 on bare stainless): * Speed: 1000-1500 mm/s * Power: 70-90% * Frequency: 100-200 kHz (adjust for darkness) * Passes: 1
Goal: You want to vaporize/ablate the coating completely, not just melt it. A perfect result will leave the engraved area looking dark and solid, with the unengraved coating easily washing away.
Step 3: Engraving and Finishing
- Run your job. With a rotary, the laser software will convert the flat image into a wrapped cylindrical engraving.
- Once complete, carefully remove the tumbler.
- Under warm water, use a soft cloth or paper towel to gently wipe away all the unengraved marking compound. The dark mark will remain.
- For extra durability, you can gently wash the engraved area with mild soap.
Pro Tips and Best Practices for Flawless Results
- Focus Perfectly: Use a metal focus gauge. Being even slightly out of focus will cause blurry marks and inconsistent darkness.
- The Mustard Trick: In a pinch, plain yellow mustard can work as a DIY marking compound. Apply a thin layer, engrave at low speed/high power, and wash off. Results vary but it's a great proof-of-concept.
- Avoid Reflective Burns: The curved surface of a tumbler can reflect the beam back into the laser lens, causing damage. Always angle your laser head slightly (2-5 degrees) so any reflection deflects away, or use a laser with built-in protective features.
- Image Preparation: Use high-contrast, black-and-white images. Dithering patterns (like Jarvis or Floyd-Steinberg) often work better for photos than simple thresholding.
- Start with a Test Grid: Always engrave a small grid of speed/power settings on your coated tumbler (or a spare stainless piece) to find the sweet spot for your specific machine and material.
Frequently Asked Questions
Can I laser engrave a Yeti cup?
Yes, absolutely. Yeti, Stanley, and other popular brand tumblers are typically made from 18/8 stainless steel and are perfect candidates for laser engraving. The process is identical to any other stainless steel tumbler. Always use a rotary attachment for a proper wrap.
Why is my laser engraving on stainless steel not dark?
This is the most common issue. The primary reasons are: 1) You are trying to engrave bare metal with a CO2/diode laser without a marking compound. 2) Your laser is out of focus. 3) Your speed is too high or power too low. 4) The surface wasn't cleaned properly before applying marking spray. 5) You didn't use enough passes to fully react the coating.
What's the best laser for engraving stainless steel tumblers?
For occasional hobbyist use, a CO2 laser like the Tyvok K1 with marking spray is a fantastic, versatile choice. For small, detailed work or production speed, a galvo laser like the Tyvok P2 is unbeatable, as it marks bare metal directly, quickly, and with incredible precision. For beginners on a budget, a diode laser like the Tyvok A1 Mini can achieve great results using the marking spray method.
Do I need special software for tumbler engraving?
You need laser software that supports a rotary attachment. This feature (often called "rotary" or "cylinder" mode) automatically wraps your 2D design around the cylinder's circumference. Most modern laser software like LightBurn has this capability and is user-friendly.
Conclusion
Laser engraving stainless steel tumblers opens up a world of creativity and potential for small business. The key to consistent, dark marks lies in matching the right technique to your laser: use a quality marking spray for diode and CO2 lasers, or invest in a purpose-built galvo laser like the Tyvok P2 for direct, spray-free marking. Remember, success is built on preparation—meticulous cleaning, precise focusing, and thorough testing. Start with the settings provided as a baseline, run your tests, and don't be afraid to experiment. Now, fire up your Tyvok laser, secure that tumbler, and start creating durable, personalized works of art that will last a lifetime.