


MOPA Fiber Laser Color Marking on Stainless Steel: The Complete 2026 Guide
Learn how to create stunning 100+ colors on stainless steel with MOPA fiber laser technology - no paint, no ink, no chemicals required.---
Introduction: The Future of Laser Marking is Colorful
In 2026, color laser marking on stainless steel has moved from industrial novelty to mainstream technology. With the right MOPA (Master Oscillator Power Amplifier) fiber laser engraver, you can now produce over 100 permanent, vibrant colors directly on stainless steel surfaces.
This revolutionary technology opens up entirely new possibilities for:
- Premium branding and product identification
- Artistic and decorative applications
- High-end jewelry and personalization
- Industrial traceability with visual differentiation
---
What is MOPA Laser Technology?
Understanding MOPA vs Standard Fiber Lasers
Traditional Q-switched fiber lasers offer limited control over pulse parameters, making color marking difficult or impossible.
MOPA technology provides independent, precise control over:- ✅ Pulse width (1-200 nanoseconds)
- ✅ Pulse frequency (1-4000 kHz)
- ✅ Laser power output
- ✅ Scanning speed and line spacing
This precise control allows operators to create controlled oxide layers on the stainless steel surface that reflect light at specific wavelengths - producing visible colors without additives.
Why MOPA is Essential for Color Marking
| Parameter | Standard Q-Switched | MOPA Fiber Laser |
|---|---|---|
| Pulse width range | Limited (typically fixed) | 1-200ns adjustable |
| Color capability | ❌ Very limited | ✅ 100+ colors |
| Process control | Basic | Precise and repeatable |
| Surface quality | Often rough | Smooth and consistent |
---
The Science Behind Laser Color Marking
How Lasers Create Color Without Paint
Color marking works through a precisely controlled thermal oxidation process:
-
Controlled Heating: The laser heats the stainless steel surface to specific temperatures
-
Oxide Layer Formation: A thin transparent oxide layer forms on the surface
-
Light Interference: Light waves reflecting from the top and bottom of the oxide layer interfere with each other
-
Color Production: Different oxide thicknesses produce different visible colors
Color Range Possible on Stainless Steel
With optimized parameters, you can achieve:
- 🔴 Reds, oranges, and browns (thinner oxide layers)
- 🟡 Yellows and golds (medium-thin layers)
- 🟢 Greens and teals (medium thickness)
- 🔵 Blues and purples (medium-thick layers)
- ⚫ Blacks and dark grays (thicker oxide layers)
- ✨ 100+ intermediate shades and variations
---
Essential Equipment for Color Laser Marking
You Need a MOPA-Enabled Fiber Laser
Not all laser engravers can do color marking. You need:1. MOPA Fiber Laser Source (Critical)
- Recommended: Tyvok P2 Galvo Laser with MOPA pulse control
- Power range: 20W-100W (60W optimal for color work)
- Pulse width adjustment: 1-200ns essential
- Frequency range: Up to 4000 kHz
2. Quality Optics and Galvanometers
- High-quality scanning galvos for consistent speed
- Precision lenses (160mm or 254mm focal length)
- Proper beam alignment and calibration
3. Material Preparation
- 304 or 316 stainless steel works best
- Mirror or brushed finish recommended
- Absolutely clean surface (no oils, fingerprints, or contaminants)
- Isopropyl alcohol and lint-free cloth essential
---
Step-by-Step Color Marking Process
Preparation is 90% of Success
Step 1: Material Preparation
1. Wipe surface thoroughly with isopropyl alcohol (91%+ purity)

2. Use lint-free microfiber cloth only

3. Avoid touching the surface with bare fingers

4. Ensure completely dry before marking

5. Secure material flat with no warping
Step 2: Machine Calibration
1. Perform precise focus calibration

2. Set lens height within ±0.1mm tolerance

3. Run test square on scrap material first

4. Verify beam alignment and uniformity
Step 3: Color Parameter Testing
Always test on scrap first! Create a parameter test grid:
| Power % | Speed mm/s | kHz | Pulse ns | Expected Color |
|---|---|---|---|---|
| 15-25% | 800-1200 | 200-400 | 4-8 | Gold / Yellow |
| 25-35% | 600-1000 | 300-500 | 6-10 | Orange / Red |
| 35-45% | 500-800 | 400-600 | 8-12 | Purple / Blue |
| 45-55% | 400-600 | 500-800 | 10-15 | Green / Teal |
| 55-70% | 300-500 | 600-1000 | 15-25 | Black / Dark |
---
Pro Tips for Perfect Color Marking
Industry Secrets From Professional Markers
1. Consistency is Everything
- Mark in a temperature-stable environment (20-25°C)
- Allow machine 15-30 minute warm-up before color work
- Keep humidity below 60% RH
- Same material batch = more consistent results
2. Single Pass Usually Best
- Multiple passes often muddy colors, not enhance them
- Exception: solid black may benefit from 2 passes
- Test single pass first before adding additional passes
3. Line Spacing Matters
- 0.03-0.05mm line spacing for smooth solid colors
- Too wide = visible lines
- Too narrow = overheating and color distortion
- Test: 0.03, 0.04, 0.05mm on your material
4. Direction and Angle
- Marking direction can affect color uniformity
- Try both unidirectional and bidirectional marking
- 45° angle sometimes produces more vibrant results
- Document what works for your specific machine
---
Common Problems and Solutions
Troubleshooting Color Marking Issues
| Problem | Likely Cause | Solution |
|---|---|---|
| No color at all | Power too low / speed too high | Increase power 5-10% or decrease speed |
| Dull / washed out colors | Surface contamination | Reclean with fresh IPA, use new cloth |
| Color not repeatable | Machine not warmed up | 30-minute warm-up before production |
| Color fades in center | Focus drifting | Recalibrate focus, check lens height |
| Rainbow effect | Uneven line spacing | Adjust hatch settings, check galvo calibration |
| Surface melting/burning | Power too high | Reduce power, increase speed |
---
Business Applications and Profit Opportunities
Turn Color Marking Into Revenue
Color laser marking creates premium pricing opportunities:
High-Margin Applications
-
Custom Jewelry Marking - Personalized messages, patterns, and colors on stainless steel jewelry ($20-$100+ per piece)
-
Premium Branding - Corporate logos and branding on high-end products (5-10x standard marking pricing)
-
Art and Decor - Colorful wall art, decorative pieces, and custom artwork
-
Industrial Differentiation - Color-coded tooling and component identification
-
Awards and Recognition - Premium awards and trophies with color elements
Pricing Strategy
Color marking commands 30-100% price premium over standard laser marking due to:
- Perceived higher value of color
- Additional skill and setup required
- Limited competition with this capability
- WOW factor that justifies premium pricing
---
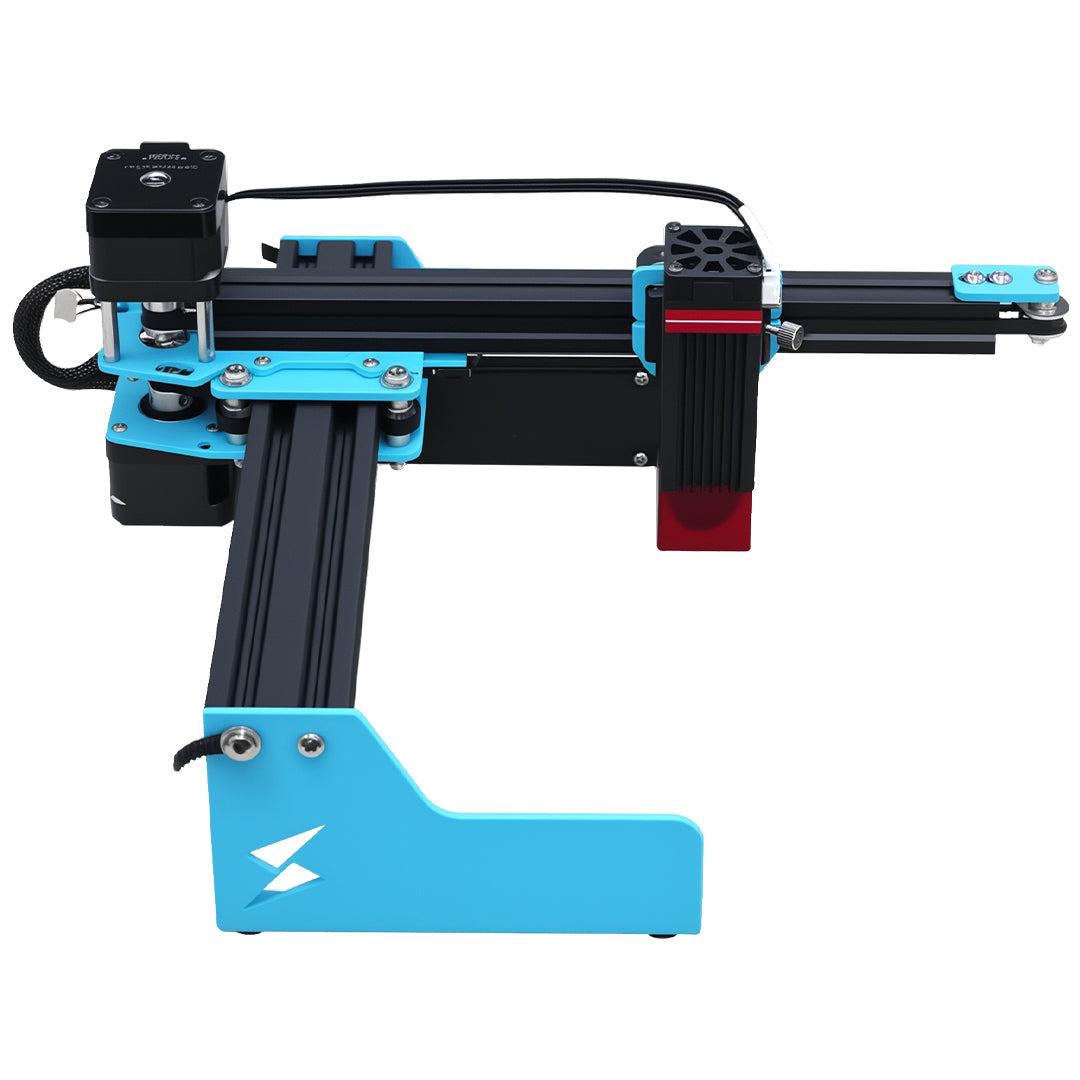
Tyvok P2 Galvo: Your Color Marking Solution
Why the P2 is Perfect for Color Work
The Tyvok P2 Galvo Laser includes professional MOPA pulse control technology making it ideal for color marking:
✅ MOPA pulse width control (essential for color) ✅ Precise frequency adjustment up to 4000 kHz ✅ High-speed galvanometer scanners for uniform marking ✅ Stainless steel workbed for consistent results ✅ Professional software support with advanced parameters
The P2 makes industrial-grade color marking accessible to small businesses, workshops, and serious hobbyists.---
Conclusion: Start Exploring Color Today
Color laser marking on stainless steel represents one of the most exciting developments in laser technology in 2026. With a MOPA-enabled laser like the Tyvok P2 Galvo, patience, and proper technique, you can produce stunning, permanent colors that were previously only possible with industrial equipment costing 10x more.
Your Action Plan:
1. Get the right equipment (MOPA fiber laser essential) 2. Start testing parameters on scrap stainless steel 3. Build a color sample portfolio for your customers 4. Market this premium capability to justify higher pricing 5. Perfect your process before production work---
Ready to start your color laser marking journey? Explore the Tyvok P2 Galvo Laser → The most affordable MOPA-enabled color marking solution for small businesses in 2026.---
Last updated: April 2026 | Published by: Tyvok Laser Engineering Team